FEAR


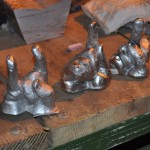
I’ve updated Robert Indiana’s iconic sculpture “LOVE” for our times!  While “Love” may have been an appropriate sentiment from 1964 to 1970 when the 2D and 3D versions were made, I think that the revised text is more appropriate for the 2000’s and 2010’s. Fear is 8” tall and 4” deep, and while not a monumental outdoor sculpture, FEAR appears fairly sizable on a table top.

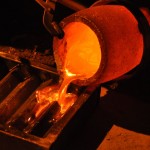
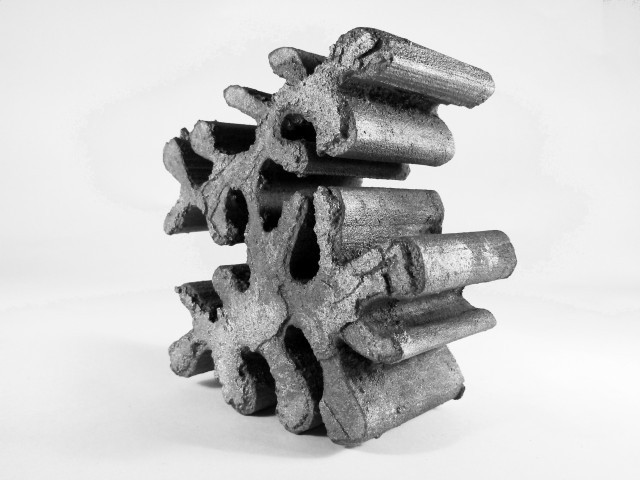
Fear, which is solid aluminum and weighs over 7 lbs, was cast last Thursday with quite a few other pieces.  The great thing about having an aluminum foundry at the Makerspace is that the whole thing cost about $7!  – $4 for propane, $1 for Styrofoam, and $3 for some Rotozip bits.  If FEAR were cast in bronze, it would weigh over 20 lbs, which would cost $200 for the metal alone.  As it is, we melted down old heat sinks, stock cutoffs and hard drive frames, so the metal is essentially free.

In the spirit of Indiana who made his own font, I drew FEAR up in Inkscape using Georgia Bold, but I increased the height of the Serifs a bit.  Shane helped me with the file manipulation and G-code generation (Thanks!), so I could use the CNC router to cut FEAR out of styrofoam.  I exported FEAR’s hairline thickness outline as .dxf so it I could bring it into CamBam to generate the G-code. The outer contour of FEAR was selected, and the following settings were chosen:

  • General -> Enabled -> True
  • General -> Name -> Outside
  • Cutting Depth -> Clearance Plane -> 0.125 (inches)
  • Cutting Depth -> Depth Increment -> 1.05 (inches)
  • Cutting Depth -> Target Depth -> -1.05 (inches)
  • Feedrates -> Cut Feedrate -> 300 (inches per second)
  • Options -> Roughing/Finishing -> Finishing
  • Tool -> Tool Diameter -> 0.125 (inches)
  • Tool -> Tool Profile -> End Mill

Identical settings were chosen for the inner contours of FEAR, with the exception of General -> Name -> Inside.   Then, I just selected “Generate G-code.”  Check out the real-time video of Makerspace CNC router running the G-code and cutting out the 1” thick Styrofoam (Owens Corning Foamular 150).

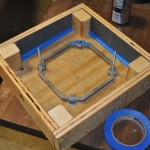
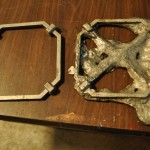
After cutting four 1” thick pieces, they were stacked and glued together.  I buried the foam FEAR in petrobond, and then attached Styrofoam sprues and vents.  For a more complete explanation of the quick lost-styrofoam casting process, check out this post.   Stay tuned for details of our next Aluminum pour, which will be in January in the New Milwaukee Makerspace!


Hot Stuff! Aluminum Pour Night.


To quote the Iron Worker on THE SIMPSONS,  “Hot stuff, coming through!”
I was pretty excited that I finally made it down to the Milwaukee Makerspace last night to attend an aluminum pour! I’ve seen a couple of the videos and really wanted to get in on some of that hot metal casting. I have what’s called a “speed-ring”, a metal ring that holds a soft-box for photographic lighting, and I wanted to make a copy of it.

So far, much of the casting has been using a “lost-styrofoam” method. A shape is carved from foam and set in sand, and the aluminum melts the foam as it’s poured in. But I wanted a COPY of an existing item. I asked Bret about it, and he said we could try an experiment of pretty much just pressing the ring down into some sand. An X channel was then added in the middle as a point for the aluminum to pour into and spread out into the shape.

I built a wood box for my item, and we filled it with oily sand, packed it in there, and added the X-trough. My item didn’t pull out of the sand quite as well as I had hoped, but hey, it’s an experiment…

Outside, the aluminum furnace was roaring away, heating aluminum to a delightful orange liquid. The first pour made it through Kevin’s FEAR art piece, my piece, and another members. Later, a second pour took care of Phil’s hand-casting series (which turned out great!)  and the rest went into an ingot mold.

Once my piece was cool enough, we pulled it out to take a look at the results. Not perfect, but not bad for a first time, and an experimental casting at that. There was quite a bit of extra metal, but most of that could be easily trimmed off with the bandsaw. Other members were taking photos of their work. It was obvious that everyone was pretty proud of their individual castings. Even without being the one pouring out twenty pounds of molten metal, it was still a pretty macho experience just to be part of.

If you too want to come play with crazy hot metal, come on down to the Makerspace next time we do an aluminum pour!

Aluminium Casting Night

This past Thursday was another great aluminium pour! I came prepared with a mold I made at work (benefits of working at a minerals company). I can’t show you guys the cast I made, cause it’s a Christmas present, but I can show you the pour!

Be on the look out on the Milwaukee Makerspace Calendar for future Aluminium pours on Thursday night at 7:00, or just come on by any Tuesday or Thursday night at 7:00 pm for our Open Meeting and Builder’s Night Out. See ya there!

Makerspace Aluminum Casting Foundry

I arrived at the Makerspace on Thursday without an idea of what I would cast in metal, and in less than two hours I was removing my piece from the steaming petrobond! Check out the fruit of two hours of labor cast in metal!

That’s right! The Milwaukee Makerspace had its first (and second) aluminum pour on Thursday! Thanks to the hard work of several members, the Makerspace now has a fully functional aluminum casting foundry.  The custom built propane and diesel powered furnace melted an entire #16 crucible of aluminum in less than 20 minutes.  Check out Brant’s video to see our fearless foundry foreman leading the two pours!

To get the foundry running quickly, we’ve started out by using a lost-styrofoam casting method.  That is, styrofoam is carved into the desired shape and then a sprue and vents are attached with hot glue(!).  This assembly is placed in a wooden form, and is surrounded by tightly packed petrobond, an oil bonded, reusable sand.   Then, the molten aluminum is poured directly onto the styrofoam sprue.  The styrofoam is instantly vaporized by the 1250 degree Fahrenheit aluminum, which fills the void in the petrobond formerly occupied by the styrofoam. The air and perhaps even some of the styrofoam residue escapes from the mold through the vents.  We’ll be phasing in bonded sand and lost wax casting soon, so stay tuned for those details.

Eventually we’ll be having aluminum casting classes; however, we’re definitely going to be having aluminum pours on alternate Thursday evenings for the next few months.  Join our mailing list / google group to get more details.  Metal pours are spectacular to watch, so feel free to stop by to see the action around 7 or 8 pm, or join the Makerspace and participate!

Makership Update

Wingnut

It’s been just under a month since we announce Frank as our first Makership recipient, and he’s been busy!

I just wanted to share these two great images of his work, featuring a “wing nut” and some skull rings.

Skull Rings

Pretty cool! Frank said he’s still getting the lay of the land at the Makerspace and figuring out who is who and what all the equipment does, but it’s good to see some progress being made.

And speaking of progress, if you want more updates, check out his blog, iFabr1kat3, where he’s documenting much of his work.